Vaisala MM70 User Manual
Browse online or download User Manual for Tools Vaisala MM70. Vaisala MM70 User Manual
- Page / 71
- Table of contents
- BOOKMARKS
- USER'S GUIDE 1
- Table of Contents 3
- CHAPTER 5 4
- List of Figures 5
- List of Tables 6
- GENERAL INFORMATION 7
- Recycling 8
- Trademarks 8
- License Agreement 8
- Warranty 9
- PRODUCT OVERVIEW AND 11
- MECHANICS 11
- 0605-094 12
- Display Parameters 14
- Options 14
- INSTALLATION AND MOUNTING 15
- OPTIONS 15
- Pipelines/Oils 16
- Installing the Probe 16
- Tightening the Clasp Nut 17
- 0605-080 18
- 0605-085 20
- MENU OPERATIONS AND SETTINGS 23
- Basic Display 24
- Graphical Display 25
- Main Menu 25
- Settings 26
- Display Settings 26
- Quantities and Units 26
- Rounding 26
- Hold/Save Display 27
- Graphic History 27
- User Interface Settings 28
- Selecting Language 29
- Automatic Power Off 29
- Changing the Shorcut Keys 30
- On/Off 30
- Setting Date and Time 30
- Device Information 31
- Restoring Factory Settings 32
- PPM-calculation 32
- Coefficients 33
- MI70 Memory 33
- Other Functions 34
- Setting the Alarm Levels 34
- 0605-093 36
- Recording Data 38
- Recording 38
- Stopping Recording 39
- Viewing Recorded Data 40
- Checking the Memory Status 40
- Deleting All Recorded Files 40
- CALIBRATION AND ADJUSTMENT 43
- HMP228 Series Transmitters 44
- 1-point Relative Humidity 45
- 2-point Relative Humidity 46
- MMT318 Transmitters 47
- Calibrator 48
- MMT330 Transmitters 50
- 2-point Adjustment 54
- 1-point Adjustment 55
- Temperature Adjustment 55
- Last Adjustment Date 57
- Error Messages 59
- Error Message Types 59
- MAINTENANCE 61
- Changing the Battery 62
- Vaisala Service Centers 63
- TECHNICAL SPECIFICATIONS 65
- MMP78 Probe 66
- MI70 Indicator 66
- Battery Pack 67
- General Facts about the MM70 67
- Hand-held Humidity and 67
- Temperature Meter 67
- Dimensions in mm (inches) 69
- Figure 22 MMP78 Probe 70
Summary of Contents
USER'S GUIDE Vaisala HUMICAP® Hand-Held Moisture and Temperature in Oil MeterMM70 M210498EN-C
USER'S GUIDE____________________________________________________________________ This page intentionally left blank. 8 ______________
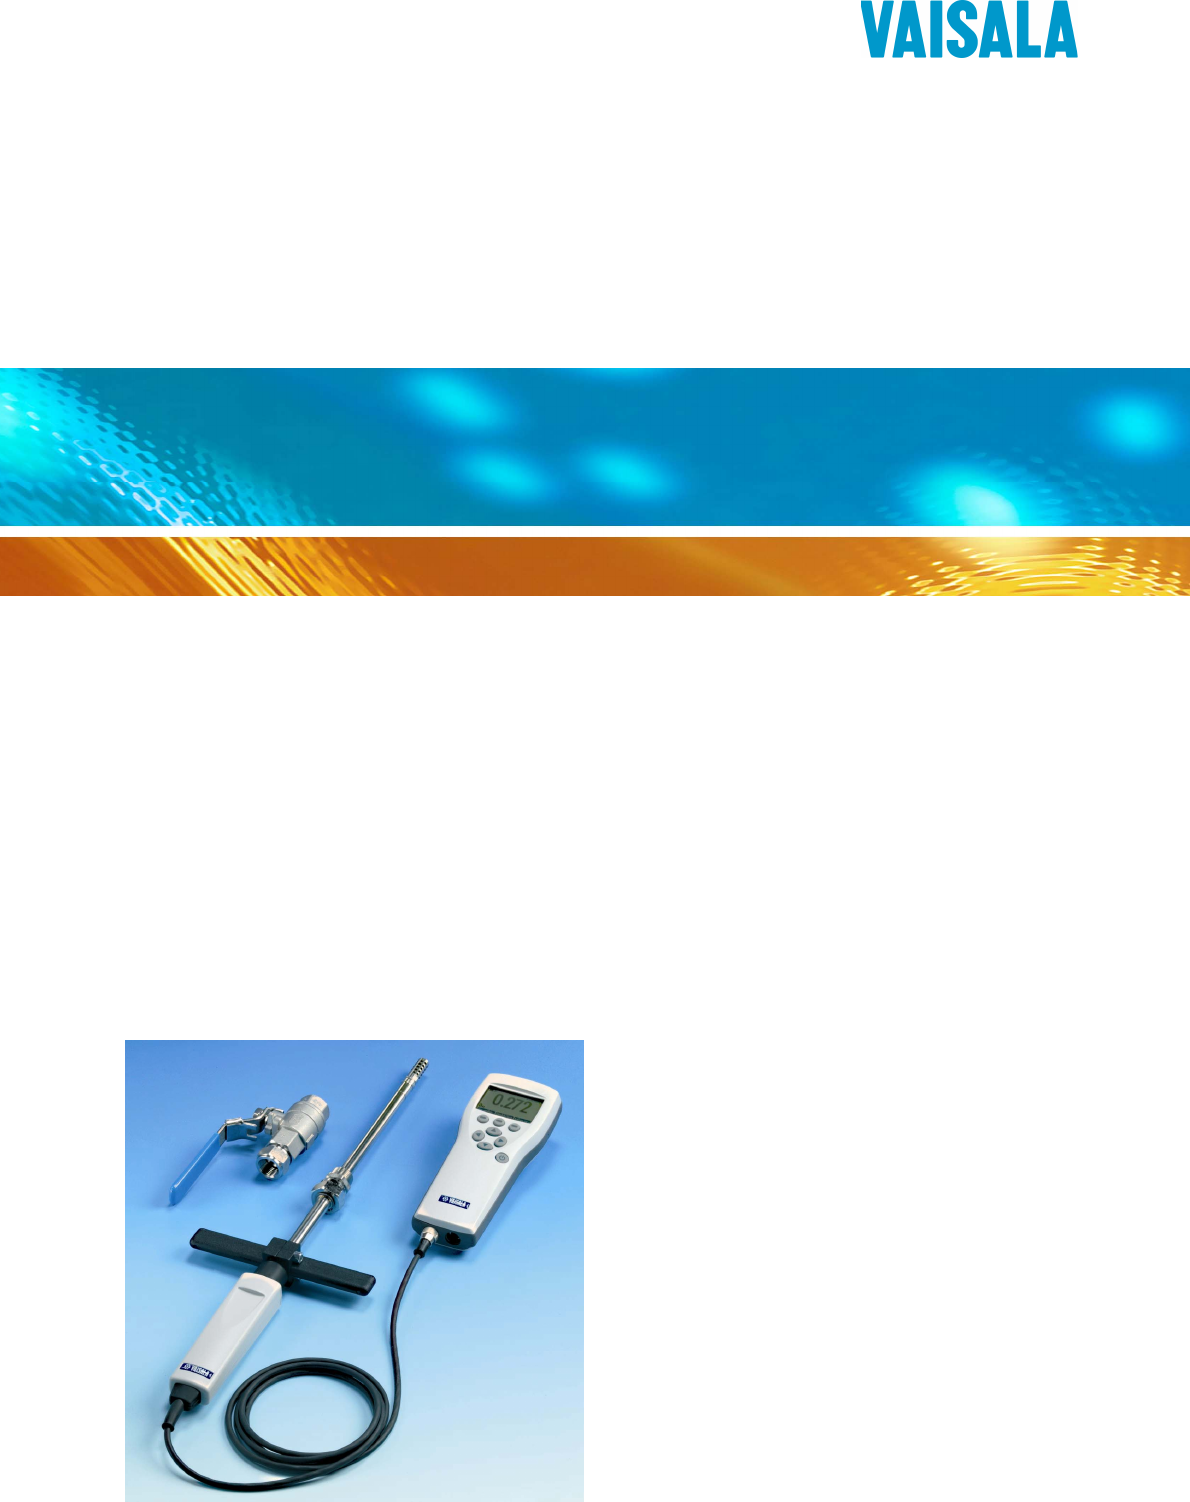
Chapter 2 _____________________________________ PRODUCT OVERVIEW AND MECHANICS CHAPTER 2 PRODUCT OVERVIEW AND MECHANICS Vaisala´s Hand-held MM70 Devi
USER'S GUIDE____________________________________________________________________ Structure of the MI70 Indicator 0605-094 Figure 1 MI Indic
Chapter 2 _____________________________________ PRODUCT OVERVIEW AND MECHANICS Structure of the MMP78 Probe 0605-087 Figure 2 MMP78 Probe The follo
USER'S GUIDE____________________________________________________________________ Display Parameters - aw: water activity - T: temperature (°C/
Chapter 3 ____________________________________ INSTALLATION AND MOUNTING OPTIONS CHAPTER 3 INSTALLATION AND MOUNTING OPTIONS Installing and Rechargin
USER'S GUIDE____________________________________________________________________ 2. Press the power on/off key. 3. Select the language by usi
Chapter 3 ____________________________________ INSTALLATION AND MOUNTING OPTIONS measurements in pipelines. The maximum installation pressure is 10 ba
USER'S GUIDE____________________________________________________________________ 0605-080 Figure 5 Tightening Clasp Nut The following numbers
Chapter 3 ____________________________________ INSTALLATION AND MOUNTING OPTIONS 0605-083 Figure 6 Sealing Thread Cutting for the Fitting Body CAUT
PUBLISHED BY Vaisala Oyj Phone (int.): +358 9 8949 1 P.O. Box 26 Fax: +358 9 8949 2227 FIN-00421 Helsinki Finland Visit our Internet pages at ht
USER'S GUIDE____________________________________________________________________ 3. Make sure that the temperature at the measurement point is
Chapter 3 ____________________________________ INSTALLATION AND MOUNTING OPTIONS NOTE The probe can be installed in the process through the ball valve
USER'S GUIDE____________________________________________________________________ This page intentionally left blank. 20 ____________
Chapter 4 _________________________________________ MENU OPERATIONS AND SETTINGS CHAPTER 4 MENU OPERATIONS AND SETTINGS Function Keys and Menu Structu
USER'S GUIDE____________________________________________________________________ - To turn the indicator on or off, press the power On/Off key.
Chapter 4 _________________________________________ MENU OPERATIONS AND SETTINGS Function keys are shortcuts to some functions or menus. Shortcuts for
USER'S GUIDE____________________________________________________________________ Settings Display Settings 0605-102 Figure 11 Display Sett
Chapter 4 _________________________________________ MENU OPERATIONS AND SETTINGS 1. Open the MENU. First press the right arrow key, and then press the
USER'S GUIDE____________________________________________________________________ 1. Open the MENU. First press the right arrow key, and then pre
Chapter 4 _________________________________________ MENU OPERATIONS AND SETTINGS Selecting Language You can select any of the following languages for
________________________________________________________________________________ Table of Contents CHAPTER 1 GENERAL INFORMATION...
USER'S GUIDE____________________________________________________________________ Changing the Shorcut Keys As a default, the function keys are s
Chapter 4 _________________________________________ MENU OPERATIONS AND SETTINGS 3. Select Date and Time. Press the right arrow key. 4. To change th
USER'S GUIDE____________________________________________________________________ 0605-099 Figure 14 Device Information Submenus Restoring Fac
Chapter 4 _________________________________________ MENU OPERATIONS AND SETTINGS If additional accuracy is needed, more information is found below in
USER'S GUIDE____________________________________________________________________ 7. Select the B value (B:0.0000) and press the SET key. 8. Se
Chapter 4 _________________________________________ MENU OPERATIONS AND SETTINGS MM70 alarms by beeping and blinking the backlight. The alarm turns on
USER'S GUIDE____________________________________________________________________ Selecting and Scaling the Analog Output 0605-093 Figure 17 A
Chapter 4 _________________________________________ MENU OPERATIONS AND SETTINGS 7. Select 0.0 V to set the value for the 0.0 V output signal, press t
USER'S GUIDE____________________________________________________________________ 2. Connect the DMP70/GMP70/HMP70 probe to the other connector p
Chapter 4 _________________________________________ MENU OPERATIONS AND SETTINGS 8. Start recording: Select Start/Stop recording, press the START key.
USER'S GUIDE____________________________________________________________________ Rounding ...
USER'S GUIDE____________________________________________________________________ Viewing Recorded Data 1. Open the MENU. First press the right a
Chapter 4 _________________________________________ MENU OPERATIONS AND SETTINGS Transferring Recorded Data to PC The recorded data can be transferred
USER'S GUIDE____________________________________________________________________ This page intentionally left blank. 40 _____________
Chapter 5 ___________________________________________ CALIBRATION AND ADJUSTMENT CHAPTER 5 CALIBRATION AND ADJUSTMENT General Notes about Calibration
USER'S GUIDE____________________________________________________________________ Calibration and Adjustment of HMP228 Series Transmitters You ca
Chapter 5 ___________________________________________ CALIBRATION AND ADJUSTMENT 0605-091 Figure 19 Adjustment Mode Relative Humidity Adjustment by
USER'S GUIDE____________________________________________________________________ 4. Wait until the reading is stabilized (takes about 30 minute
Chapter 5 ___________________________________________ CALIBRATION AND ADJUSTMENT 10. Enter the second reference humidity value by using the arrow key
USER'S GUIDE____________________________________________________________________ 1. Select aw, RH, T or H2O (H2O can only be checked, not adjust
Chapter 5 ___________________________________________ CALIBRATION AND ADJUSTMENT 8. Adjustment is done. To return to the basic display, first press t
________________________________________________________________________________ Preparations before the Calibration ...
USER'S GUIDE____________________________________________________________________ Calibration and Adjustment of MMT330 Transmitters You can check
Chapter 5 ___________________________________________ CALIBRATION AND ADJUSTMENT 2. Check that the probes are located in equal conditions and wait un
USER'S GUIDE____________________________________________________________________ 2-point Adjustment by Using a Calibrator When using this adjust
Chapter 5 ___________________________________________ CALIBRATION AND ADJUSTMENT Calibration and Adjustment of MM70 Series Probes General about Calib
USER'S GUIDE____________________________________________________________________ have to feed the reference values, the MM70 displays the accura
Chapter 5 ___________________________________________ CALIBRATION AND ADJUSTMENT 14. Confirm the adjustment, press the YES key (by pressing the NO ke
USER'S GUIDE____________________________________________________________________ 1-point Adjustment When using this adjustment method, start wit
Chapter 5 ___________________________________________ CALIBRATION AND ADJUSTMENT 8. Calibration is done. To return to the basic display, first press
USER'S GUIDE____________________________________________________________________ NOTE If the oil sample is very dry and the temperatures are cl
Chapter 5 ___________________________________________ CALIBRATION AND ADJUSTMENT NOTE If the oil sample is very dry, and the temperatures are close t
USER'S GUIDE____________________________________________________________________ Figure 15 Measurement Setting Menus...
USER'S GUIDE____________________________________________________________________ This page intentionally left blank. 58 _____________
Chapter 6 ___________________________________________________________ MAINTENANCE CHAPTER 6 MAINTENANCE Changing the Filter and Sensor 1. Screw out t
USER'S GUIDE____________________________________________________________________ Changing the Battery A new rechargeable battery pack can be or
Chapter 6 ___________________________________________________________ MAINTENANCE Vaisala Service Centers VAISALA __________________________________
USER'S GUIDE____________________________________________________________________ This page intentionally left blank. 62 _____________
Chapter 7 ______________________________________________ TECHNICAL SPECIFICATIONS CHAPTER 7 TECHNICAL SPECIFICATIONS Measured Variables Water Activity
USER'S GUIDE____________________________________________________________________ MMP78 Probe Humidity sensor HUMICAP Temperature sensor Pt 100
Chapter 7 ______________________________________________ TECHNICAL SPECIFICATIONS Accuracy 0.2 % full scale Temperature dependence 0.002 %/ C full s
USER'S GUIDE____________________________________________________________________ Options and Accessories Available Table 3 List of Options and
Chapter 7 ______________________________________________ TECHNICAL SPECIFICATIONS Dimensions in mm (inches) Figure 21 MI70 Indicator VAISALA _______
Chapter 1 __________________________________________________ GENERAL INFORMATION CHAPTER 1 GENERAL INFORMATION About This Manual This manual provides
USER'S GUIDE____________________________________________________________________ Adjustment range 250m m340 (13.39)190 (7.48)170 (6.69)13.5 (0.
www.vaisala.com *M210498EN*
USER'S GUIDE____________________________________________________________________ To make sure you are not delivering high static voltages yourse
Chapter 1 __________________________________________________ GENERAL INFORMATION Warranty Vaisala hereby represents and warrants all Products manufact
More documents for Tools Vaisala MM70


Related products and manuals for Tools Vaisala MM70
 (66 pages)
(81 pages)
(66 pages)
(81 pages)
 (164 pages)
 (156 pages)
(181 pages)
(171 pages)
(156 pages)
(181 pages)
(171 pages)
© 2020, manymanuals.com. All rights reserved. | 2.810 s |
 Manymanuals.com
 Manymanuals.de
 Manymanuals.fr
 Manymanuals.it
 Manymanuals.pl
 Manymanuals.cz
 Manymanuals.es
 Manymanuals-pt.com
Comments to this Manuals